Install MobbScan on your premises
Learn how to install MobbScan Server on your own premises.
Before you install
This document is intended to be a simple guide on how to install MobbScan on your premises. Please be advised that MobbScan supports several operation modes and configurations and the final instructions may vary from case to case, depending on the project and/or client's requirements.
MobbScan Server
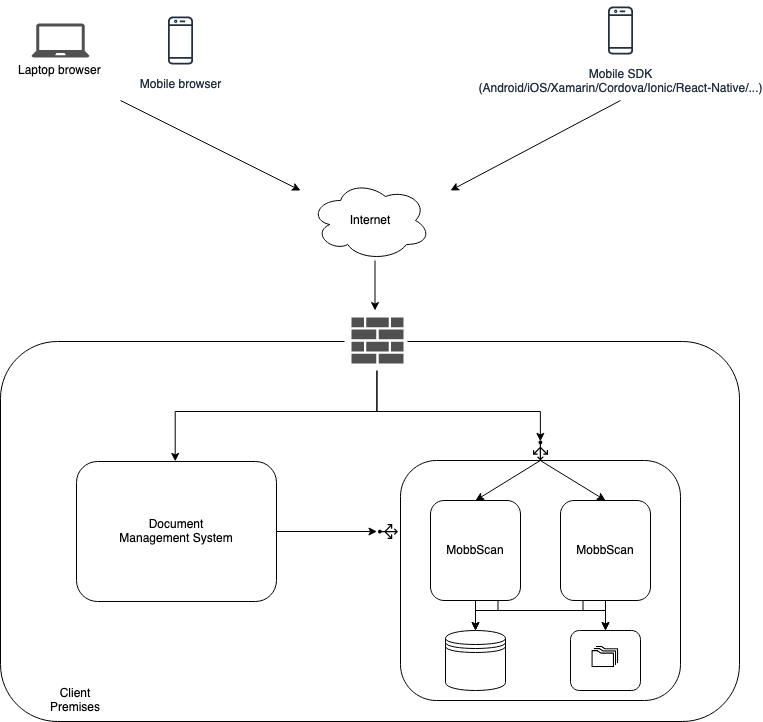
The previous diagram shows the typical components:
- MobbScan SDKs (Android, iOS, Cordova, Xamarin, ionic, React-Native, Javacript, etc) integrated into mobile/browser apps
- MobbScan Server components installed on the client's premises
The server side is composed by several components working together exposing a single API.
Docker images
Docker is the container technology used to distributed and install the server side components of MobbScan.
This is the list of all available MobbScan Docker images:
| Image | Version (**) |
|---|---|
| registry.mobbeel.com/com.mobbeel/mobbscan-ubuntu-xenial64-opencv346 | 2.9.8 |
| registry.mobbeel.com/com.mobbeel/mobbscan-mysql | 2.9.8 |
| registry.mobbeel.com/com.mobbeel/mobbscan-document_classification | 1.3.0 |
| registry.mobbeel.com/com.mobbeel/mobbscan-document_detection | 1.4.0 |
| registry.mobbeel.com/com.mobbeel/mobbscan-document_ocr | 1.5.4 |
| registry.mobbeel.com/com.mobbeel/mobbscan-document_verification | 1.5.0 |
| registry.mobbeel.com/com.mobbeel/mobbscan-document_verification | 0.3.0 |
| registry.mobbeel.com/com.mobbeel/face-biometrics-proxy | 1.1.1 |
Note1: MobbScan docker images are not publicly available. They are distributed through a private docker registry. Request your access credentials to your contact person at Mobbeel.
Note2: Please be aware that not all components are always required. Their use depends on the project's requirements and configuration.
Docker images distribution
Docker images are distributed using our private docker registry:
- URL: registry.mobbeel.com
- Access: Please contact a Mobbeel representative to request your user credentials
Please follow these steps to download the required images for your user's case:
- Login into the private registry:
docker login registry.mobbeel.com
- Pull the required images:
docker pull registry.mobbeel.com/com.mobbeel/mobbscan-ubuntu-xenial64-opencv346:2.9.8
- Check that the images you require are downloaded:
docker images | grep "registry.mobbeel.com"
--
registry.mobbeel.com/com.mobbeel/mobbscan-mysql                         2.9.8       16630e95bb50        2 weeks ago
registry.mobbeel.com/com.mobbeel/mobbscan-ubuntu-xenial64-opencv346     2.9.8       75e24dba96ac        2 weeks ago
...
Environments
You could set up each environment differently, but these are common configurations:
- Development
- Stage/UAT
- Production
Note: Please review the software/hardware requirements before installing MobbScan on any of your servers.
Development environment
The development environment is usually installed and configured in an "autonomous" mode, meaning that every required component is installed in the same server, including database and shared file system.
Please follow these steps to install and configure a development environment.
- Get root access
sudo -s
- Log in into the Mobbeel's docker private registry
docker login registry.mobbeel.com
- Download the docker images you require.
docker pull registry.mobbeel.com/com.mobbeel/mobbscan-ubuntu-xenial64-opencv346:2.9.8
docker pull registry.mobbeel.com/com.mobbeel/mobbscan-mysql:2.9.8
docker pull registry.mobbeel.com/com.mobbeel/mobbscan-document_detection:1.4.0
docker pull registry.mobbeel.com/com.mobbeel/mobbscan-document_ocr:1.5.4
docker pull registry.mobbeel.com/com.mobbeel/mobbscan-document_classification:1.3.0
docker pull registry.mobbeel.com/com.mobbeel/mobbscan-document_verification:1.5.0
docker pull registry.mobbeel.com/com.mobbeel/face-biometrics-api:0.3.0
docker pull registry.mobbeel.com/com.mobbeel/face-biometrics-proxy:1.1.0
- Make sure the images are downloaded:
docker images
The output of the command should look something like this:
registry.mobbeel.com/com.mobbeel/mobbscan-mysql                          2.9.8               93c3ec8e018a
registry.mobbeel.com/com.mobbeel/mobbscan-ubuntu-xenial64-opencv346      2.9.8               7da993985436
registry.mobbeel.com/com.mobbeel/mobbscan-document_classification        1.3.0               673478570a6a
registry.mobbeel.com/com.mobbeel/mobbscan-document_ocr                   1.5.4               39b73f9fd022
registry.mobbeel.com/com.mobbeel/mobbscan-document_detection             1.4.0               b22b55b374bb
registry.mobbeel.com/com.mobbeel/mobbscan-document_verification          1.5.0               a26c55c6813b
registry.mobbeel.com/com.mobbeel/face-biometrics-api                     1.1.0               82b612765e53
registry.mobbeel.com/com.mobbeel/face-biometrics-proxy                   0.3.0               fd4ed685de5b
- Create a new folder where you will configure all components
cd /opt
mkdir mobbscan-configuration
##These folder are required to mount the Docker volumens so the information is persisted between restarts and/or containters creation/deletion
cd mobbscan-configuration
mkdir samples
mkdir licenses
mkdir db-data
Copy the license file provided by Mobbeel in this folder /opt/mobbscan-configuration/licenses
Create the deployment docker file
vim docker-stack.yml
- Edit the file and add this information
version: '3.4'

services:
    mobbscan-db:
        image: registry.mobbeel.com/com.mobbeel/mobbscan-mysql:2.9.8
        environment:
            - MYSQL_ROOT_PASSWORD=********
            - MYSQL_DATABASE=MOBBSCAN
        ports:
            - "3306:3306/tcp"
        volumes:
            - /opt/mobbscan-configuration/db-data:/var/lib/mysql
    mobbscan:
        image: registry.mobbeel.com/com.mobbeel/mobbscan-ubuntu-xenial64-opencv346:2.9.8
        ports:
            - "8080:8080/tcp"
        volumes:
            - /opt/mobbscan-configuration/samples:/var/lib/tomcat8/mobbscan-work/samples
            - /opt/mobbscan-configuration/licenses:/var/lib/tomcat8/mobbscan-work/lic
        environment:
            - jdbc.driverclassname=com.mysql.jdbc.Driver
            - jdbc.url=jdbc:mysql://mobbscan-db:3306/MOBBSCAN
            - jdbc.username=********
            - jdbc.password=********
            - dnn_classification_service=true
            - dnn_detection_service=true
            - dnn_ocr_service=true
            - dnn_verification_service=true
            - mobbscan_dnn_document_classification_url=http://document_classification:8080/classification-document-mobbeel-api/v1/classification
            - mobbscan_dnn_document_detection_url=http://document_detection:8080/document_detection_dnn/api/detect
            - mobbscan_dnn_document_ocr_url=http://document_ocr:8080/ocr-api/prediction
            - mobbscan_dnn_document_verification_url=http://document_verification:8080/document-verification-mobbeel/api/verification
            - face_matching_url=http://face-biometrics-proxy:8080/mobbid-facerecognition/face/matching
            - spring.profiles.active=mysql,pro

    document_ocr:
        image: registry.mobbeel.com/com.mobbeel/mobbscan-document_ocr:1.5.4
        ports:
            - "8080/tcp"
        environment:
            - GUNICORN_WORKER=2
    document_detection:
        image: registry.mobbeel.com/com.mobbeel/mobbscan-document_detection:1.4.0
        ports:
            - "8080/tcp"
        environment:
            - GUNICORN_WORKER=2
    document_classification:
        image: registry.mobbeel.com/com.mobbeel/mobbscan-document_classification:1.3.0
        ports:
            - "8080/tcp"
        environment:
            - GUNICORN_WORKER=2
    document_verification:
        image: registry.mobbeel.com/com.mobbeel/mobbscan-document_verification:1.5.0
        ports:
            - "8080/tcp"
        environment:
            - GUNICORN_WORKER=2
    face-biometrics-proxy:
        image: registry.mobbeel.com/com.mobbeel/face-biometrics-proxy:0.3.0
        ports:
            - "8080/tcp"
    face-biometrics-api:
        image: registry.mobbeel.com/com.mobbeel/face-biometrics-api:1.1.0
        ports:
            - "8080/tcp"
        environment:
            MOBBEEL_V1_URL: http://face-identification-mobbeel:8080/face-identication-mobbeel/v1
            STORE_RESULTS: "False"
- Deploy the solution (Make sure the
swarmmode is initialised withdocker swarm init)
docker stack deploy --compose-file /opt/mobbscan-configuration/docker-stack.yml MobbScanStack
- Check that everything is right. The output of the command should look something like this:
$> docker stack ps MobbScanStack
ID                  NAME                                          IMAGE                                                                       NODE                DESIRED STATE       CURRENT STATE           ERROR               PORTS
z10smueqhh0h        MobbscanStack_document_classification.1       registry.mobbeel.com/com.mobbeel/mobbscan-document_classification:1.3.0     docker-desktop      Running             Running 4 minutes ago
zjgumtc2fngu        MobbscanStack_document_detection.1            registry.mobbeel.com/com.mobbeel/mobbscan-document_detection:1.4.0          docker-desktop      Running             Running 4 minutes ago
fng7x9tp8rzj        MobbscanStack_document_ocr.1                  registry.mobbeel.com/com.mobbeel/mobbscan-document_ocr:1.5.4                docker-desktop      Running             Running 4 minutes ago
rdx7x9tp8rzj        MobbscanStack_document_verification.1         registry.mobbeel.com/com.mobbeel/mobbscan-document_verification:1.5.0       docker-desktop      Running             Running 4 minutes ago
gxz7866xxmku        MobbscanStack_mobbscan.1                      registry.mobbeel.com/com.mobbeel/mobbscan-ubuntu-xenial64-opencv346:2.9.8   docker-desktop      Running             Running 4 minutes ago
vt37yyh4l897        MobbscanStack_mobbscan-db.1                 registry.mobbeel.com/com.mobbeel/mobbscan-mysql:2.9.8                       docker-desktop      Running             Running 4 minutes ago
fdxf7k5aqvyp        MobbscanStack_face-biometrics-api.1           registry.mobbeel.com/com.mobbeel/face-recognition-api:1.1.0                 docker-desktop      Running             Running 4 minutes ago
mpv3wq91hqeu        MobbscanStack_face-biometrics-proxy.1         registry.mobbeel.com/com.mobbeel/face-identification-mobbeel:0.3.0          docker-desktop      Running             Running 4 minutes ago
- Check out the server is responding properly.
curl http://SERVER_IP:8080/mobbscan/health.json
{
  "code": "OK",
  "description": "Everything is OK"
}
- Check that the right version is installed.
curl http://SERVER_IP:8080/mobbscan/version.json
{
   "code" : "OK",
   "description" : "OK",
   "buildDate" : "XXXXXXXXXXX",
   "platformVersion" : "2.9.8"
}
- Check that your license is working properly
curl -X POST \
  'http://SERVER_IP:8080/mobbscan/scan/start.json' \
  -H 'content-type: multipart/form-data' \
  -F operationMode=SCAN_ONLY_BACK \
  -F licenseId=YOUR_LICENSE \
  -F documentType=ESPIDCard
{
  "code": "OK",
  "description": "START_SCAN_SUCCESS",
  "scanId": "4bb8f83f-8eed-40c2-ba72-a50afcef7761"
}
- Almost there... Access the backoffice administration dashboard and create a new user to be able to review the scan processes.
The backoffice is available at http://SERVER_IP:8080/mobbscan/admin. Use the default admin user:
- username:
admin - password:
admin
In the "Admin panel" you can create an user (option "Create user"). You'll be able to create a user that will have access to the documents linked to your license.
- You're done! You can now use http://SERVER_IP:8080/mobbscan/ to start scanning documents and reviewing the results.
Customizations and comments
This is just an example of how to configure MobbScan on a single server, but it could also be done using only Docker Compose instead of Docker Swarm, or any other orchestrator such as Kubernetes or OpenShift. If you are not familiar with Docker Swarm please find out more info here
Mounted volumes
MobbScan docker images are ephemeral and they do not store nor preserve any information unless configured to do so. The docker-stack.yml configuration file shown above mounts three different volumes to persist information when the images are stopped, destroyed, replaced, etc:
db-datawill store the database information extracted by the APIsampleswill store the images sent to be analysed to the API (if the API is configured to preserve the images)licenseswill store the license file provided to you that will enable the API to work properly
Note: Both the
db-dataandsamplesvolumes must work together, so if you mount one you must mount the other one as well.
Database configuration
If you prefer not to use the Docker container for the development database just point to your own mysql instance (version 5.7.x) and configure the yaml deployment file according to these environment variables:
    - jdbc.url=jdbc:mysql://XXXXXXXXXXXXXXXXXXXXXXXXXXXXXXXXXX/MOBBSCAN
    - jdbc.username=XXXXXXXXXXXXXXXX
    - jdbc.password=XXXXXXXXXXXXXXXX
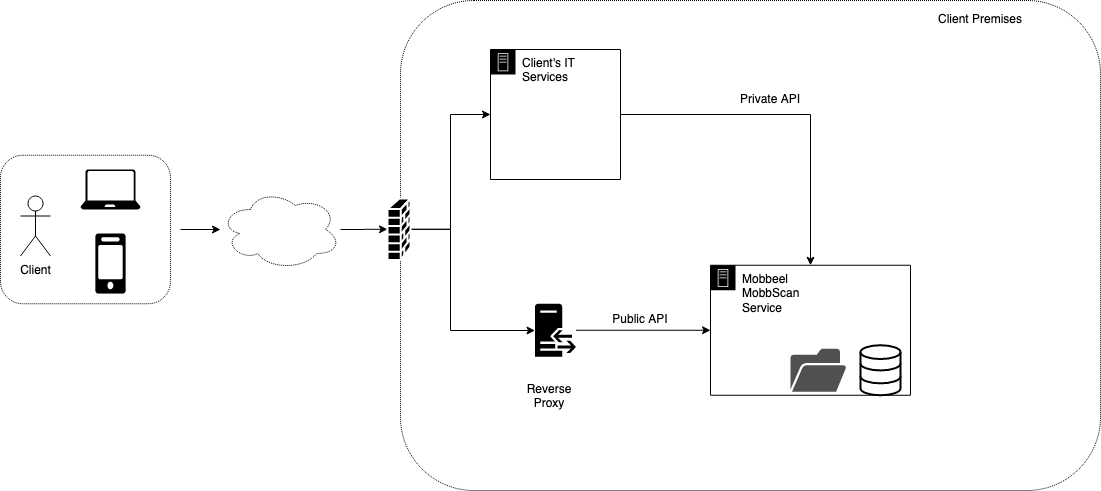
Proxy
The previous configuration assumes that the API is accessed using a proxy with an SSL offloading.
environment:
    # ...
    - spring.profiles.active=mysql,pro
If you plan to access the API for development without https please change this setting to:
environment:
    # ...
    - spring.profiles.active=mysql,dev
Delete processes automatically
To enable the deletion of each scanning process automatically you have to add these environment variables to the MobbScan service on the deployment file:
- delete_all_sessions=true
- delete_unfinished_sessions=true
- delete_unfinished_sessions_older_than_seconds=XXXX
Example:
version: '3.4'

services:
    mobbscan:
        image: registry.mobbeel.com/com.mobbeel/mobbscan-ubuntu-xenial64-opencv346:2.9.8
        ports:
            - "8080:8080/tcp"
        volumes:
            - /opt/mobbscan-configuration/samples:/var/lib/tomcat8/mobbscan-work/samples
            - /opt/mobbscan-configuration/licenses:/var/lib/tomcat8/mobbscan-work/lic
        environment:
            - jdbc.driverclassname=com.mysql.jdbc.Driver
            - jdbc.url=jdbc:mysql://DATABASE_IP:DATABASE_PORT/MOBBSCAN
            - jdbc.username=**********
            - jdbc.password=**********
            - ...
            - delete_all_sessions=true
            - delete_unfinished_sessions=true
            # 15(days)*24(hours)*60(minutes)*60(seconds)
            - delete_unfinished_sessions_older_than_seconds=1296000
    ...
    ...
Production environment
There is not single optimal configuration to run MobbScan on-premises for a production deployment. Here's an example of an approach used successfully on a live production site.

Components:
- Proxy/Load Balancer: It is used to do the ssl offloading and load balance the request among the MobbScan instances (at least two). It will also take care of the sticky session (if needed). The MobbScan API is stateless but the backoffice to review the samples is not, so a sticky session will only be needed in case you're using the backoffice.
- API Instances: The preferred approach here is to create a virtual image containing a running configuration of MobbScan (with the required components for the particular use case) so it can be replicated as many times as needed so as to support the incoming workload. The image will basically contain all the stateless MobbScan containers. The other required components will be deployed elsewhere to be accessible from all the "replicated" instances.
- Database: It is recommended that the database is installed with some redundancy or cluster approach.
- Filesystem: A Network File System (NFS) is required to store the files and images produced by the API. You could tweak the Docker volumes directly or just configure the server to mount the NFS endpoint in the same folder you would use to mount the Docker volume.
If you use Amazon AWS you could use these service for each layer:
- Proxy/Load Balancer: AWS ALB
- API Instances: AWS EC2 + AMI encapsulating each set of MobbScan docker images
- Database: AWS RDS
- Filesystem: AWS EFS
Here's the example yaml configuration file for the swarm.
version: '3.4'

services:
    mobbscan:
        image: registry.mobbeel.com/com.mobbeel/mobbscan-ubuntu-xenial64-opencv346:2.9.8
        ports:
            - "8080:8080/tcp"
        volumes:
            - /opt/mobbscan-configuration/samples:/var/lib/tomcat8/mobbscan-work/samples
            - /opt/mobbscan-configuration/licenses:/var/lib/tomcat8/mobbscan-work/lic
        environment:
            - jdbc.driverclassname=com.mysql.jdbc.Driver
            - jdbc.url=jdbc:mysql://YOUR_DATABASE_HOST:YOUR_DATABASE_PORT/MOBBSCAN
            - jdbc.username=********
            - jdbc.password=********
            - dnn_classification_service=true
            - dnn_detection_service=true
            - dnn_ocr_service=true
            - dnn_verification_service=true
            - mobbscan_dnn_document_classification_url=http://document_classification:8080/classification-document-mobbeel-api/v1/classification
            - mobbscan_dnn_document_detection_url=http://document_detection:8080/document_detection_dnn/api/detect
            - mobbscan_dnn_document_ocr_url=http://document_ocr:8080/ocr-api/prediction
            - mobbscan_dnn_document_verification_url=http://document_verification:8080/document-verification-mobbeel/api/verification
            - face_matching_url=http://face-biometrics-proxy:8080/mobbid-facerecognition/face/matching
            - spring.profiles.active=mysql,pro

    document_ocr:
        image: registry.mobbeel.com/com.mobbeel/mobbscan-document_ocr:1.5.4
        ports:
            - "8080/tcp"
        environment:
            - GUNICORN_WORKER=2
    document_detection:
        image: registry.mobbeel.com/com.mobbeel/mobbscan-document_detection:1.4.0
        ports:
            - "8080/tcp"
        environment:
            - GUNICORN_WORKER=2
    document_classification:
        image: registry.mobbeel.com/com.mobbeel/mobbscan-document_classification:1.3.0
        ports:
            - "8080/tcp"
        environment:
            - GUNICORN_WORKER=2
    document_verification:
        image: registry.mobbeel.com/com.mobbeel/mobbscan-document_verification:1.5.0
        ports:
            - "8080/tcp"
        environment:
            - GUNICORN_WORKER=2
    face-biometrics-proxy:
        image: registry.mobbeel.com/com.mobbeel/face-biometrics-proxy:0.3.0
        ports:
            - "8080/tcp"
    face-biometrics-api:
        image: registry.mobbeel.com/com.mobbeel/face-biometrics-api:1.1.0
        ports:
            - "8080/tcp"
        environment:
            MOBBEEL_V1_URL: http://face-identification-mobbeel:8080/face-identication-mobbeel/v1
            STORE_RESULTS: "False"
- This approach configures two nodes in "active" mode, meaning that the load balancer will distribute each request equally between the active nodes.
- The number of nodes in the "cluster" could be incremented at any time by deploying a new "cloned" server and adding it to the list of nodes controlled by the load balancer.
- The load balancer configuration is not in the scope of this document.
- The ssl offloading should be handled on the reverse proxy (or the firewall).
- The previous configuration file is exactly the same as the one used for the development environment but for the utility database container which is not recommended for production.
Node configuration
The configuration of the production servers is very similar to those of development but taking into account:
- The database should be installed and configured in its own server (in cluster mode if possible)
- The shared filesystem (NFS) must be shared among all active nodes in the cluster.
Database configuration
Please ask your Mobbeel representative for the appropriate files (sql scripts) to provision the external database.
Logs
MobbScan services redirect their logs to the standard output so you can easily configure the Docker Log driver to redirect it to your preferred centralised log system.
Orchestration support
MobbScan does not yet provide full Kubernetes nor Swarm support out of the box. We are currently working on it and it will be available in future releases.
Maintenance
Update the MobbScan version
If you need to update the version of a MobbScan container you could do it easily by following these steps:
- Download the updated image version from the private docker registry
- Update the version number on the deployment file.
- Update the stack
- Download the updated image version you need to update from the private Docker registry
docker pull registry.mobbeel.com/com.mobbeel/mobbscan-ubuntu-xenial64-opencv346:2.9.9
docker pull registry.mobbeel.com/com.mobbeel/mobbscan-mysql:2.9.9
Update the version number on the deployment file (usually in
/opt/mobbscan-configuration/)Get the stack name you previously deployed
docker stack ls
- Re-deploy it again. The stack would be updated to match the configuration on the deployment file
docker stack deploy --compose-file ~/opt/mobbscan-configuration/docker-stack.yml MobbScanStack
If everything goes right when you execute "docker stack ps MobbScanStack" you should see something like:
ID                  NAME                                IMAGE                                                                       NODE                DESIRED STATE       CURRENT STATE          ERROR                              PORTS
k9yfpkeapmyn        MobbscanStack_mobbscan.1            registry.mobbeel.com/com.mobbeel/mobbscan-ubuntu-xenial64-opencv346:2.9.9   docker-desktop      Running             Running 4 hours ago
kqx03cd3ecxe        MobbscanStack_mobbscan-db.1       registry.mobbeel.com/com.mobbeel/mobbscan-mysql:2.9.9                       docker-desktop      Running             Running 4 hours ago
Update the database
Mobbeel will provide the scripts to handle the update of the data in case that it is necessary. You could use your favourite MySQL client to connect to the database (development, UAT, production, etc) to execute the scripts.
Useful commands
Find out the name of the stack deployed on the server**
docker stack ls
NAME                SERVICES            ORCHESTRATOR
MobbScanStack       2                   Swarm
The name of the stack is MobbScanStack
Deployment status
docker stack ps MobbScanStack
ID                  NAME                                IMAGE                                                                        NODE                DESIRED STATE       CURRENT STATE             ERROR                         PORTS
q29u4r6qxcfe        MobbScanStack_mobbscan.1            registry.mobbeel.com/com.mobbeel/mobbscan-ubuntu-xenial64-opencv346:latest   docker-desktop      Running             Running 17 minutes ago
le55ldvqwudd        MobbScanStack_mobbscan-db.1       registry.mobbeel.com/com.mobbeel/mobbscan-mysql:latest                       docker-desktop      Running             Running 17 minutes ago
If there has been any errors or restart of any of the containers it would appear here.
Inspect the logs
docker service logs MobbScanStack_mobbscan
MobbScanStack_mobbscan.1.q29u4r6qxcfe@docker-desktop    |  2020-02-10 11:10:00,732 [localhost-startStop-1] DEBUG   c.m.m.c.ValidationController - Rejected bean name 'defaultResponseMessages': no URL paths identified
MobbScanStack_mobbscan.1.q29u4r6qxcfe@docker-desktop    |  2020-02-10 11:10:00,732 [localhost-startStop-1] DEBUG   c.m.m.c.ValidationController - Rejected bean name 'swaggerPluginAdapter': no URL paths identified
MobbScanStack_mobbscan.1.q29u4r6qxcfe@docker-desktop    |  2020-02-10 11:10:00,732 [localhost-startStop-1] DEBUG   c.m.m.c.ValidationController - Rejected bean name 'jacksonSwaggerSupport': no URL paths identified
MobbScanStack_mobbscan.1.q29u4r6qxcfe@docker-desktop    |  2020-02-10 11:10:00,732 [localhost-startStop-1] DEBUG   c.m.m.c.ValidationController - Rejected bean name 'customImplementation': no URL paths identified
MobbScanStack_mobbscan.1.q29u4r6qxcfe@docker-desktop    |  2020-02-10 11:10:00,732 [localhost-startStop-1] DEBUG   c.m.m.c.ValidationController - Rejected bean name 'environment': no URL paths identified
MobbScanStack_mobbscan.1.q29u4r6qxcfe@docker-desktop    |  2020-02-10 11:10:00,732 [localhost-startStop-1] DEBUG   c.m.m.c.ValidationController - Rejected bean name 'systemProperties': no URL paths identified
MobbScanStack_mobbscan.1.q29u4r6qxcfe@docker-desktop    |  2020-02-10 11:10:00,732 [localhost-startStop-1] DEBUG   c.m.m.c.ValidationController - Rejected bean name 'systemEnvironment': no URL paths identified
MobbScanStack_mobbscan.1.q29u4r6qxcfe@docker-desktop    |  2020-02-10 11:10:00,733 [localhost-startStop-1] DEBUG   c.m.m.c.ValidationController - Rejected bean name 'servletConfig': no URL paths identified
MobbScanStack_mobbscan.1.q29u4r6qxcfe@docker-desktop    |  2020-02-10 11:10:00,733 [localhost-startStop-1] DEBUG   c.m.m.c.ValidationController - Rejected bean name 'org.springframework.context.annotation.ConfigurationClassPostProcessor.importRegistry': no URL paths identified
MobbScanStack_mobbscan.1.q29u4r6qxcfe@docker-desktop    |  2020-02-10 11:10:00,733 [localhost-startStop-1] DEBUG   c.m.m.c.ValidationController - Rejected bean name 'applicationEventMulticaster': no URL paths identified
MobbScanStack_mobbscan.1.q29u4r6qxcfe@docker-desktop    | 10-Feb-2020 11:10:02.381 INFO [localhost-startStop-1] org.apache.catalina.startup.HostConfig.deployWAR Deployment of web application archive [/var/lib/tomcat8/webapps/mobbscan.war] has finished in [30,959] ms
MobbScanStack_mobbscan.1.q29u4r6qxcfe@docker-desktop    | 10-Feb-2020 11:10:02.383 INFO [localhost-startStop-1] org.apache.catalina.startup.HostConfig.deployDirectory Deploying web application directory [/var/lib/tomcat8/webapps/ROOT]
MobbScanStack_mobbscan.1.q29u4r6qxcfe@docker-desktop    | 10-Feb-2020 11:10:02.399 INFO [localhost-startStop-1] org.apache.jasper.servlet.TldScanner.scanJars At least one JAR was scanned for TLDs yet contained no TLDs. Enable debug logging for this logger for a complete list of JARs that were scanned but no TLDs were found in them. Skipping unneeded JARs during scanning can improve startup time and JSP compilation time.
MobbScanStack_mobbscan.1.q29u4r6qxcfe@docker-desktop    | 10-Feb-2020 11:10:02.403 INFO [localhost-startStop-1] org.apache.catalina.startup.HostConfig.deployDirectory Deployment of web application directory [/var/lib/tomcat8/webapps/ROOT] has finished in [20] ms
MobbScanStack_mobbscan.1.q29u4r6qxcfe@docker-desktop    | 10-Feb-2020 11:10:02.411 INFO [main] org.apache.coyote.AbstractProtocol.start Starting ProtocolHandler ["http-nio-8080"]
MobbScanStack_mobbscan.1.q29u4r6qxcfe@docker-desktop    | 10-Feb-2020 11:10:02.420 INFO [main] org.apache.coyote.AbstractProtocol.start Starting ProtocolHandler ["ajp-nio-8009"]
MobbScanStack_mobbscan.1.q29u4r6qxcfe@docker-desktop    | 10-Feb-2020 11:10:02.427 INFO [main] org.apache.catalina.startup.Catalina.start Server startup in 31072 ms
If you use the option "-f" on the command you would obtain a tailing of the logs and the output will be updated automatically docker service logs MobbScanStack_mobbscan -f
Remove the service and create it again
Remove the stack
docker stack rm MobbScanStack
Deploy the stack again
docker stack deploy --compose-file /opt/mobbscan-configuration/docker-stack.yml MobbScanStack
If you get this error when deploying the stack this node is not a swarm manager. Use "docker swarm init" or "docker swarm join" to connect this node to swarm and try again just execute docker swarm init and then the deploy again.